Chapter 3. Configuration
This chapter will explain the configuration structure of the STON Edge Server and how to apply the settings. Understanding the configuration structure is important in not only setting up the server quickly but also troubleshooting any problems that occur.
Configuration consists of global (server.xml) and virtual host (vhosts.xml) configuration.
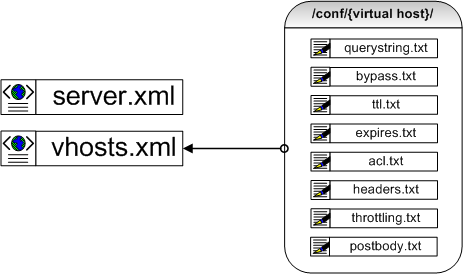
Two XML files are all that is needed.
The two XML files are what comprise most of the service. Various TXT files are used for exception handling for each virtual host and for listing certain functions. The following illustrates the complete form of the XML.
<Server>
    <VHostDefault>
        <Options>
            <CaseSensitive>ON</CaseSensitive>
        </Options>
    </VHostDefault>
</Server>
However, explaining functions using this format is rather inconvenient, so it will instead be explained in this simplified format.
# server.xml - <Server><VHostDefault><Options>

<CaseSensitive>ON</CaseSensitive>
Note
The license file (license.xml) is not a configuration file.
Reload Settings
After changing the settings, the administrator must make a call to the API. Aside from system or performance settings, most settings will immediately be applied without interrupting the service.
http://127.0.0.1:10040/conf/reload
Any changes from settings will be recorded in the Info Log.
Global Settings (server.xml)
The server.xml file is the global settings file and can be found in the same path as the execution file. It is an XML format text file.
# server.xml

<Server>
    <Host> ... </Host>
    <Cache> ... </Cache>
    <VHostDefault> ... </VHostDefault>
</Server>
We will first cover the configuration structure and basic functions. While Chapter 15. Access Control and Chapter 11. SNMP are also part of global settings, they will be explained in their respective chapters.
Administrator Settings
The following configures the administrator settings of the system.
# server.xml - <Server>

<Host>
    <Name>stream_07</Name>
    <Admin>admin@example.com</Admin>
    <Manager Port="10040" HttpMethod="ON" Role="Admin" UploadMultipartName="confile">
        <Allow>192.168.1.1</Allow>
        <Allow Role="Admin">192.168.2.1-255</Allow>
        <Allow Role="User">192.168.3.0/24</Allow>
        <Allow Role="Looker">192.168.4.0/255.255.255.0</Allow>
    </Manager>
</Host>
<Name>This configures the server name. If left blank, it will use the system name.
<Admin>This configures the administrator’s information (name or email address). This item is only used for the SNMP inquiry.
<Manager>This configures the manager port and the ACL (Access Control List) for administrative purposes. The ACL supports the four forms of IP, IP range, BitMask, and Subnet. If the IP address of the connected session is not authorized by the <Allow> list, the server will block the connection. An IP that calls an API must be configured in the
<Allow>list.After the access conditions, the access authorization (Role) can also be configured. Any requests without authorization will be responded to with a 401 Unauthorized message. If Role properties are not declared in
<Allow>conditions, theRoleproperty from the<Manager>tag will be applied.AdminAll API calls are allowed.UserOnly Chapter 10. Monitoring & Statistics and Appendix A: Graph API calls are allowed.LookerOnly Appendix A: Graph API calls are allowed.
In addition, there are other minor administrative properties.
HttpMethodON (default)HTTP Method will check ACL when called.OFFHTTP Method will not check ACL when called.
UploadMultipartNameConfigures variable names in Configuration Upload.
Storage Settings
This section will explain the setup of storage that will store cached content.
# server.xml - <Server>

<Cache>
    <Storage DiskFailSec="60" DiskFailCount="10" OnCrash="hang">
        <Disk>/user/cache1</Disk>
        <Disk>/user/cache2</Disk>
        <Disk Quota="100">/user/cache3</Disk>
    </Storage>
</Cache>
<Storage>This configures the disk that will store the content. There is no limit to the number of subordinate
<Disk>s.Because the disk is where problems are most likely to happen, it is recommended to set specific fail conditions. If a disk operation fails more than
DiskFailCount (default: 10)times withinDiskFailSec (default: 60)seconds, then that disk will be excluded from the service. The status of that disk will be shown as “invalid”.If all disks are excluded, then the server will operate according to the
OnCrashproperty.hang (default)Will put all the excluded disks back to work. This behavior is more likely to protect the origin server rather than return to normal service.bypassAll requests will be passed to the origin server. If the disk recovers, STON will start taking care of the service as soon as it can.selfkillSTON will be shut down.
The maximum caching capacity for each disk can be configured with the Quota (unit: GB) property. Even when not specifically configured, the LRU (Least Recently Used) algorithm is used to automatically delete old content to ensure that there is always space on the disk. Therefore, there is no large effect on performance regardless of the file system the administrator chooses to use.
Memory Restriction
This configures the maximum available memory and the ratio of loaded content.
# server.xml - <Server>

<Cache>
    <SystemMemoryRatio>100</SystemMemoryRatio>
    <ContentMemoryRatio>50</ContentMemoryRatio>
</Cache>
<SystemMemoryRatio> (default: 100%)This ratio will configure the maximum amount of system memory that STON will use. For example, if this property is set to 50% with 16 GB of memory, the system will operate as if there were only 8 GB of memory. This option is especially useful when used together with other processes such as Chapter 17 File System.
<ContentMemoryRatio> (default: 50%)STON improves service quality by caching as much of the Body data as possible from disk to memory. This ratio can be adjusted to optimize the quality of the service according to its type.
The ratio of memory is configured using the ContentMemoryRatio property.
Using the gaming example, if there are not many files but there is a lot of content, it places a burden on File I/O. In this case, raising the
<ContentMemoryRatio>value allows more data to reside in memory, thus improving service quality.
If ContentMemoryRatio is raised, I/O load decreases.
Other Caching Settings
This section covers other caching service functions.
# server.xml - <Server>

<Cache>
    <Cleanup>
        <Time>02:00</Time>
        <Age>0</Age>
    </Cleanup>
    <Listen>0.0.0.0</Listen>
    <ConfigHistory>30</ConfigHistory>
</Cache>
<Cleanup>The server carries out system optimization once a day. The optimization procedure mainly consists of disk cleanup, which creates I/O load. In order to prevent a drop in service quality, optimization is performed gradually.
<Time> (default: 2 AM)Configures when cleanup is performed. A 24-hour clock is used, so for example, 11:10 PM should be written as 23:10.<Age> (default: 0, unit: days)If set to a value greater than zero, content that has not been accessed in the specified amount of time will be deleted. This is for the sake of securing available space on the disk in advance to lower the possibility that there will not be enough space during service time.
<Listen>Assigns a list of IP addresses for all virtual hosts to listen to. The default Listen setting of *:80 for all virtual hosts stands for 0.0.0.0:80. The following is an example of enabling specific IP addresses.
# server.xml - <Server>

<Cache>
  <Listen>10.10.10.10</Listen>
  <Listen>10.10.10.11</Listen>
  <Listen>127.0.0.2</Listen>
</Cache>
<ConfigHistory> (default: 30 days)STON backs up the configuration settings when changes are made. The configuration files will be compressed into one file and saved at ./conf/. The file will be named in a “DATE_TIME_HASH.tgz” format, as follows.
20130910_174843_D62CA26F16FE7C66F81D215D8C52266AB70AA5C8.tgz
If two files have identical hash values, it means they have identical settings. Even if Restore Configuration is called, it will be saved as a new configuration. A backup file will only be stored for the set amount of time after Cleanup is performed. There is no limit to the amount of time that backups can be stored.
Forced Cleanup
Cleanup is executed with an API call. An <Age> parameter can be attached.
http://127.0.0.1:10040/command/cleanup
http://127.0.0.1:10040/command/cleanup?age=10
If <Age> is zero, cleanup will be performed only when there is insufficient disk space. If <Age> is greater than 0, then content that has not been accessed for that amount of days will be deleted.
Virtual Host Default Settings
Administrators can configure each virtual host with different settings. However, it can be exhausting to set identical settings for new virtual hosts. All virtual hosts will inherit <VHostDefault> .
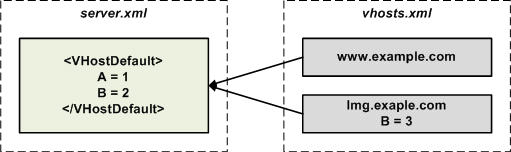
A simple inheritance.
In the figure above, www.example.com does not override any value and thus has the values A=1 and B=2. Meanwhile, img.example.com has overridden the value of B and thus has the values A=1 and B=3. Administrators will normally keep services with similar attributes on the same server, making inheritance extremely effective.
<VHostDefault> consists of five function-based subordinate tags.
# server.xml - <Server>

<VHostDefault>
    <Options> ... </Options>
    <OriginOptions> ... </OriginOptions>
    <Media> ... </Media>
    <Stats> ... </Stats>
    <Log> ... </Log>
</VHostDefault>
For example, the function for Chapter 17. Media is configured in the <Media> tag.
Virtual Host Settings (vhosts.xml)
The vhosts.xml file is recognized as the virtual host settings file and can be found in the same path as the execution file. There is no limit to the amount of virtual hosts that are allowed.
# vhosts.xml

<Vhosts>
    <Vhost Status="Active" Name="www.example.com"> ... </Vhost>
    <Vhost Status="Active" Name="img.example.com"> ... </Vhost>
    <Vhost Status="Active" Name="vod.example.com"> ... </Vhost>
</Vhosts>
Create/Remove Virtual Host
Virtual hosts are set up with the <Vhost> tag within the <Vhosts> tag.
# vhosts.xml - <Vhosts>

<Vhost Status="Active" Name="www.example.com">
    <Origin>
        <Address>10.10.10.10</Address>
    </Origin>
</Vhost>
<Vhost>configures the virtual host.Status (default: Active)An inactive status means the virtual host does not run. Cached content is still stored.NameThe name of the virtual host. Identical names cannot be used.
If a <Vhost> tag is erased then the corresponding virtual host is deleted, along with all of its stored content. Even if the virtual host is readded, the deleted content cannot be restored.
Discovering a Virtual Host
The following is the simplest form of an HTTP request.
GET / HTTP/1.1
Host: www.example.com
Most web servers will discover virtual hosts with a Host header. If a virtual host wants to operate under different names, the <Alias> tag can be used.
# vhosts.xml - <Vhosts>

<Vhost Name="example.com">
    <Alias>another.com</Alias>
    <Alias>*.sub.example.com</Alias>
</Vhost>
<Alias>- This option configures the alias of a virtual host. There is no limit to the amount of aliases that can be assigned. Aliases can be assigned using both specific domain names (another.com) or patterned domain names (*.sub.example.com). For patterned domain names, only a simple format with an asterisk as a prefix is supported.
When discovering a virtual host, follow the procedures below.
- Does the
Nameof the<Vhost>match? - Does the specific
<Alias>match? - Does the patterned
<Alias>match?
Facade Virtual Host
Because <Alias> is just a nickname for the virtual host, it will not provide separate statistics and logs. If you want to use the same virtual host but obtain different Client Statistics and Access Log depending on the domain, a Facade Virtual Host can be configured.
# vhosts.xml - <Vhosts>

<Vhost Name="example.com">
   ...
</Vhost>

<Vhost Name="another.com" Status="facade:example.com">
   ...
</Vhost>
This can be done by inputting facade: + virtual host into the Status property. In the previous example, the Client Statistics and Access Log will be recorded for clients that request another.com, not example.com.
Sub-Path
A single virtual host can have different sub-paths. These sub-paths can be configured to be handled by separate virtual hosts.
# vhosts.xml - <Vhosts>

<Vhost Name="sports.com">
  <Sub Status="Active">
    <Path Vhost="baseball.com">/baseball/<Path>
    <Path Vhost="football.com">/football/<Path>
    <Path Vhost="photo.com">/*.jpg<Path>
  </Sub>
</Vhost>

<Vhost Name="baseball.com" />
<Vhost Name="football.com" />
<Vhost Name="photo.com" />
If the page path or pattern matches the
<Sub>input, then it will be sent to the corresponding virtual host. If they do not match, then the page will be handled by the current virtual host.Status (default: Active)Sub-paths are ignored when inactive.<Path>If the URI requested by the client and the path match, the request will be sent toVhost. Only paths or patterns are allowed.<Path Vhost="baseball.com">baseball<Path> <Path Vhost="photo.com">*.jpg<Path>
If input as above, they will be parsed as /baseball/ and /*.jpg, respectively.
For example, if the client requests the following, the request will be sent to the football.com virtual host.
GET /football/rank.html HTTP/1.1
Host: sports.com
Default Virtual Host
A default virtual host can be assigned for cases when a virtual host cannot be found for a request. If a default virtual host is not assigned, the request will be abandoned.
# vhosts.xml

<Vhosts>
    <Vhost Status="Active" Name="www.example.com"> ... </Vhost>
    <Vhost Status="Active" Name="img.example.com"> ... </Vhost>
    <Default>www.example.com</Default>
</Vhosts>
<Default>- Configures the name of the default virtual host. It must use a string identical to the
Nameproperty from a<Vhost>tag.
Service Address
This section explains how to configure the service address.
# vhosts.xml - <Vhosts>

<Vhost Name="www.example.com">
    <Listen>*:80</Listen>
</Vhost>
<Listen> (default: *:80)The service address is configured in an {IP}:{Port} format. If written as *:80, for example, then all requests that arrive at port 80 from the NIC will be handled. If a service is supposed to process only requests from a specific address (1.1.1.1) and port (90), then the following setting will do.
# vhosts.xml - <Vhosts>

<Vhost Name="www.example.com">
    <Listen>1.1.1.1:90</Listen>
</Vhost>
Note
If you do not wish to open the service port, you can configure with the OFF setting.
# vhosts.xml - <Vhosts>

<Vhost Name="www.example.com">
   <Listen>OFF</Listen>
</Vhost>
Virtual Host - Exceptions (.txt)
There are some cases during the service when the following exceptions should be allowed.
- POST requests are not allowed in general, but a POST request from a specific URL should be allowed.
- STON responds to all GET requests in general, but requests from a specific IP band may want to be be be bypassed to the origin server.
- A limit should be placed on transmission speeds for specific countries.
These exceptions are not configured in the XML file; rather, settings are saved as TXT files under the ./svc/virtualhost/ directory. Each virtual host has its own independent exception settings. Exceptions will be explained in more detail in the relevant section.
Checking the Virtual Host List
This command queries the virtual host list.
http://127.0.0.1:10040/monitoring/vhostslist
The result is returned in JSON format.
{
   "version": "1.1.9",
   "method": "vhostslist",
   "status": "OK",
   "result": [ "www.example.com","www.foobar.com", "site1.com" ]
}
Confirm Configuration
The next step is to confirm the configuration files. Each TXT file must be clearly assigned to a specific virtual host.
http://127.0.0.1:10040/conf/server.xml
http://127.0.0.1:10040/conf/vhosts.xml
http://127.0.0.1:10040/conf/querystring.txt?vhost=www.example.com
http://127.0.0.1:10040/conf/bypass.txt?vhost=www.example.com
http://127.0.0.1:10040/conf/ttl.txt?vhost=www.example.com
http://127.0.0.1:10040/conf/expires.txt?vhost=www.example.com
http://127.0.0.1:10040/conf/acl.txt?vhost=www.example.com
http://127.0.0.1:10040/conf/headers.txt?vhost=www.example.com
http://127.0.0.1:10040/conf/throttling.txt?vhost=www.example.com
http://127.0.0.1:10040/conf/postbody.txt?vhost=www.example.com
Configuration History
The following command allows you to browse backup configuration histories.
http://127.0.0.1:10040/conf/latest
http://127.0.0.1:10040/conf/history
The result is returned in JSON format. Checking only the latest configuration is fastest using /conf/latest.
{
    "history" :
    [
        {
            "id" : "5",
            "conf-date" : "2013-11-06",
            "conf-time" : "15:26:37",
            "type" : "loaded",
            "size" : "16368",
            "hash" : "D62CA26F16FE7C66F81D215D8C52266AB70AA5C8",
            "ver": "1.2.8"
        },
        {
            "id" : "6",
            "conf-date" : "2013-11-07",
            "conf-time" : "07:02:21",
            "type" : "modified",
            "size" : "27544",
            "hash" : "F81D215D8C52266AB70AA5C8D62CA26F16FE7C66",
            "ver": "1.2.8"
        }
    ]
}
idThe unique identification number (+1 per reload).conf-dateConfiguration modified date.conf-timeConfiguration modified time.typeWhen settings take effect.loadedWhen STON is loaded.modifiedWhen a configuration is modified (by administrator or WM).uploadedWhen a configuration file is uploaded via API.restoredWhen a configuration file is restored via API.
sizeThe size of a configuration file.hashThe hash value of the configuration file using the SHA-1 algorithm.
Restore Configuration
This command restores the configuration to when a certain hash value or id was created. If both the hash value and id are stated in the command, the hash value takes precedence. If rollback occurs successfully, the result will be “200 OK”, while a failure will result in “500 Internal Error”.
http://127.0.0.1:10040/conf/restore?hash=...
http://127.0.0.1:10040/conf/restore?id=...
Configuration Download
This command will download a configuration of a time when a hash value or id was created. If both the hash value and id are stated in the command, the hash value takes precedence. The Content-Type will be displayed as “application/x-compressed”. If a hash value is not stated and the id cannot be found, the command will return “404 NOT FOUND”.
http://127.0.0.1:10040/conf/download?hash=...
http://127.0.0.1:10040/conf/download?id=...
Configuration Upload
This command will upload the configuration file using the HTTP Post method (Multipart supported).
http://127.0.0.1:10040/conf/upload
The address, Content-Length, and Content-Type (=”multipart/form-data”) must be clearly stated in the command as shown below.
POST /conf/upload
Content-Length: 16455
Content-Type: multipart/form-data; boundary=......
When the upload is completed, the configuration file will be extracted and applied to the system immediately.
In the multipart method, “confile” is used as a default name. This name can be changed in the UploadMultipartName property of the <Manager> tag.
<form enctype="multipart/form-data" action="http://127.0.0.1:10040/conf/upload" method="POST">
    <input name="confile" type="file" />
    <input type="submit" value="Upload" />
</form>